Hi there. My name is Gary Hughes, and I'm a technical product manager here at Quest. Thank you for joining me for this video for a migration of SharePoint with On Demand Migration. Today, we will be reviewing the features and options available for the discovery, matching and mapping, as well as the migration of SharePoint site collections, sites, permissions, and of course its contents.
Since SharePoint migrations can quickly become very complex, it is worth checking out our documentation for On Demand Migrations to understand what exactly we can migrate and support. Simply search for the section called What We Migrate within the SharePoint migration user guide. But now, let's jump into the demo.
So here we are in our migration dashboard. In this dashboard, you can find the various modules of On Demand Migration, including Accounts, Mail. SharePoint, OneDrive, Public Folders, and Teams. As you can see from the dashboard, the accounts I want to migrate for this 10 into 10 migration have already been discovered, matched, and migrated from source to target. This is highly recommended to ensure that membership and content ownership are processed correctly during the migration. For this video, we want to jump right into the SharePoint migration module.
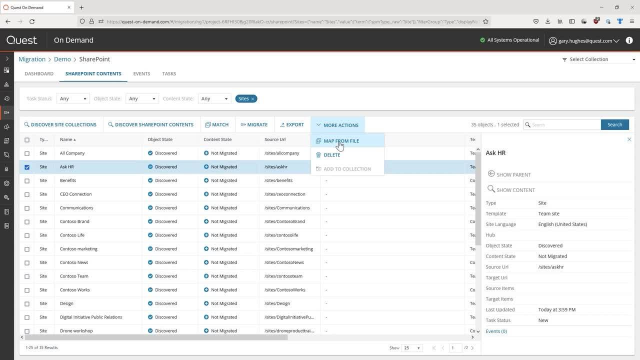
First, we get a view of the SharePoint migration dashboard from where we can either follow the breadcrumbs to help us get started, or we can change into the SharePoint Contents tab and start configuring the migrations directly. Before we run any migration, we have to discover our site collections with a new discovery task. We can either do this by gathering all supported site collections automatically or by uploading a CSV file, which has the desired site collections already listed.
Just like nearly all tasks and jobs within On Demand, we can now decide if we want to run this test now, later, or at a scheduled time and date. Up next, we get a quick summary of our discovery task. And when we click on Finish, our task will be added to On Demand in the task list.
Now that this job has completed, we can go back into the SharePoint Contents tab and find a list of all our supported site collections from SharePoint. Based on this list, we can now run a secondary job to discover all of its SharePoint site contents, meaning every single sub-site and its lists and libraries and its content can also be identified by On Demand, which will enable us to run a migration on a more granular level if desired to do so.
To ensure that no data is lost or duplicated, match the source site collections with the corresponding type of SharePoint objects using the matching task. Alternatively, we can also manually map our source to the target to bring across our SharePoint sites using the Map From File option here. This file is simply a CSV file, which lists a source URL with our target URL. For our demo today, we will let On Demand automatically map our site collection to the target tenants.
Once completed, we can quickly identify our site collection, which has been matched or mapped from the Object State column in our dashboard. And you can also see the target URL which is being used for the migration. To migrate any match to our map sites, we can simply select these site collections from the dashboard and then click on Migrate.
From here, we can now define how we want our SharePoint sites and site collections to be migrated. Should we have any unmatched users, in this case, we can enter a default account which these users will be mapped to. We can decide to include our child structure and contents and also clear any SharePoint objects which are already existing in the target. Depending on how many versions we want to migrate, we can make our selection on the next page.
Our default setting is to migrate the latest version only. Alternatively, of course, we can migrate all versions. However, this will see your migration take significantly longer, given the nature of how SharePoint applies its versioning. The middle ground for version settings is to migrate more versions. We can select how many versions we want to bring across. Based on our number of versions, we can apply which versions we want to migrate.
Should this be only the latest version and preceding versions or alternatively, the latest versions and daily latest from preceding days? In addition to this, we can also add file size limits. If the latest version exceeds the file size limit, it will be migrated, but previous versions will be ignored. Once again, define when you want this test run, and confirm your configuration from the summary page. Our immigration task will now start.
With any migration running, once we change into the SharePoint Contents page, we can find that our SharePoint site which we've matched or mapped has now been provisioned, and we are currently in the content state of migrated. Once it's completed, as you can see, this will be updated to the status of Migrated. For more information, including technical documentation, white papers, and data sheets, please visit quest.com/on-demand. Thank you for watching.