Hi, my name is Jeff Surretsky, and I'm a systems consultant.
Today I'm going to show you how to install and configure SharePlex. SharePlex is a solution to replicate data. In this video, we'll be focusing on Oracle to Oracle replication. There are five steps to install and configure SharePlex. First, we need to download the software from our website. Next, we'll install the software. The very next step will be to create a configuration file. Once we do that, we activate the configuration file, and then we'll validate replication.
So now we're going to install the SharePlex binaries onto our source server. We'll first log in as the Oracle OS user and locate the file that we just downloaded. We'll extract this tar file using the tar xvf command. And once we do that, we'll get the result, which is a TPM file. This file is a self unpacking executable. Which will guide us through the installation. So once the file is unpacked, our very first question will be to enter the product directory location. And this will house the executables for SharePlex.
For our installation, we're going to use the home/oracle/splex/prod directory. Next, we're going to enter the variable data directory location. And this will be home/oracle/splex/var. This will house the dynamic transient data that SharePlex uses. The very next question here is to specify the SharePlex admin group. And by default, you'll see the Oracle group is selected. We are actually going to use that as our default. And the SID that corresponds to our installation is selected by default as O-R-L-I-10. We'll hit Enter to make that selection. And then the installation queries the or temp file corresponding to that oracle sid. Now we're verifying that, that is in fact correct, by simply hitting enter.
The very next question here will be to enter the TCP/IP port for SharePlex. So SharePlex communicates to another server using a specific TCP/IP port. You can specify that, or just accept the default, which in our case will be 2100. Now we can verify all the selections we just made, by simply hitting Enter or proceeding with this installation. Yes. The product is now being installed onto our server. And, in order to verify that we have access to this product, we can enter a license key. And we do have a license key, so we're going to hit Enter for yes. And we'll paste in our license key right here. And the customer name in this case will be trial version. Installation on our source server has been successful.
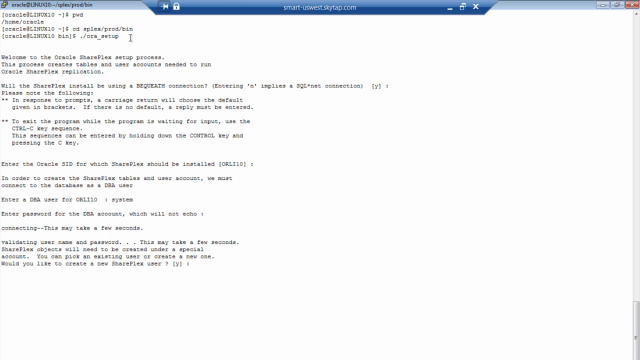
Now we're going to prepare the Oracle database for SharePlex by installing a SharePlex user, and that's done through the ora setup program, which is located in the splex/prod/bin directory. Basically, it's the base directory where we installed SharePlex prod/bin. So let's run that. The very first question here is, will SharePlex install be using a bequeath connection? So by default, yes it is selected, and that implies that we're not going to be using sqlnet but the database is local on our system. The only reason why we'd want to select no, for using a sqlnet connection, is if we were running on a cluster, or we were connecting to a multi-tenant database. So let's hit enter for yes.
So the Oracle SID that corresponds to our installation on the source, is O-R-L-I-10. And we'll just simply hit Enter. Here, now we're going to need to supply a DBA user, in order to create the new SharePlex user. And we'll simply use system, but it could be really any user that is a member of the DBA roll. So once verified, we get asked, would we like to create a new user, and the answer is yes.
By default, the user is S-P-L-E-X with the password of S-P-L-E-X. If we want to make that selection, we can simply hit Enter, or we can enter our own user and password, depending on what your standards are. So now the user is created, we're going to enter the default tablespace, which is USERS in this case, but you can select any tablespace that you want. And the temporary tablespace by SharePlex is going to be TEMP. Now, if you wish to separate or segregate tables and indexes, you do have that choice at this point in time, but I'm simply going to select USERS.
Well the current set up be with O-R-L-I-10 being used as a source, and in fact, that is the case. So we're just going to hit Enter. Now, the SharePlex product is fully installed on the source machine. So we completed the installation on the source, you need to do the exact installation on the target machine. Now our next step will be to create the configuration file and activate it.
So now that we've fully installed SharePlex on both the source and the target, we'll need to start share SharePlex up. We start SharePlex up using the sp cop program, which is located under where we installed SharePlex. The product directory and the bin directory. So notice when we start SharePlex up, we use the ampersand sign. This will ensure that SharePlex runs in the background. Now once SharePlex is up and running, we'll need to interact with it, and we use the command line interface denoted by the program S-P underscore C-T-R-L.
Once in the command line interface, we can now define what we want to replicate, and we do that through creation of a config file. And that config file will define what table or tables or schemas that we wish to replicate. So lets create a config file called test1. And we'll type our configuration file as so. Now, please note the syntax. Datasource:o.SID, this is the sid of our source. Underneath, we have the source table, the target table and the routing map. Also note there is a syntax for schema replication using a wildcard. Today, we're just showing replication on one